Tuesday, 10 December 2013

Bright and Cheerful Crocheted Bowl


Not exactly a recycling project this time - since I bought the coloured twine with something like this in mind! I just loved the colours and they were too good to use for the bean canes in the garden!


The quantity of twine more or less dictated the size and shape. In order to make the coloured stuff go further the base of this bowl is worked in parcel twine which I happened to find next to the tape dispenser. One row of double and one of treble (the first of the bowl side) were worked in the bright pink, Then one of treble in 'indigo' followed by a second treble row with alternate trebles replaced by as ingle chain - this produced a saving in twine and had the effect of curving the top of the bowl inwards slightly. Producing close work in quite stiff twine has been quite tiring for my hands. I have lime green and turquoise left, together with small quantities of indigo and pink and more parcel twine, a second bowl will follow in due course.


This first one has been put to good use as a temporary container for 'daisy brooch' background panels - awaiting their daisies!!


Tuesday, 3 December 2013

My work table - bookmarks in production!


There are several gaps in my stocks now. These two bookmarks will fill two of them - felted and embroidered, they just need their ribbon tails.

The bookmarks are part of my recycling philosophy. The backing felt into which I felt with my embellisher machine, is produced from recycled plastic bottles. Quite apart from a wish to use such materials as much as possible, I have tried using wool felt and I do not find it as effective. It tends to stretch very easily and this is particularly noticeable when the edges of the work piece become 'wavy'.

My threads and wools are grouped on the mat produced on my peg loom (see post from a few days ago). My plant pot pincushion is an aerosol spray lid, covered in felt, packed tightly with polyester wadding over which is stretched recycled T-shirt fabric, with crocheted daisies and ladybird button added for fun! It stands well and the pins cannot penetrate the base.

Perhaps the most important item in the photo is my snippets jar. As I stitch, particularly the garden designs which have a high density of embroidery, the yarn and thread snippets are placed in the pot. These, in their turn will provide the felted meadows and harvest scenes of future items.

Bookmarks to be listed shortly!

Monday, 2 December 2013

Work Baskets - from recycled materials

This was my first attempt at making a 'project' basket. It would no longer be an option in Wales, where, quite rightly, we are not provided with unnecessary carrier bags. This also precedes the days of biodegradable carrier bags which would, I fear, give an affect something like mouse or beetle damage might to other materials!! Anyway, this one has been much used. Carrier bags cut in a 'continuous spiral', wound into a ball and crocheted, using a 'slightly too small' hook to give a close texture. Work a circular base to the desired size, then stop increasing ( as is necessary to produce a flat circle) and, instead, continue on the same number of stitches to make the basket sides. Crocheted string provides the handles - the plastic may not have been strong enough. This one remains unlined. Pictured with a throw in progress - bright colours I thought I might use for the garden or camping - hexagonal patches in a 'cotton effect' yarn.


This one was my second - reclaimed red T-shirts this time (and kids pyjamas I think). Lined with a curtain fabric - hem a length which measures from the rim to the center of the base (plus turnings) and long enough to go round the basket rim (plus seem allowance). Stitch the 'side' seam to make a cylinder. Gather the unfinished edge tightly to make the center of the lining base. Slip stitch the neatened top edge to the inside of the basket. Long handles are made from plaited lengths of 'T-shirt' yarn. Pictured with more processed 'T-shirt yarn' awaiting a project:


This blue version is very similar to the red one. In this case 'T-shirt yarn' is combined with some rounds of torn, recycled shirt fabric in blue shades. The handles for this one are some recycled webbing - but I can't remember their original purpose!


Pictured with the collection of yarns used for the felted light house design accessories - bookmarks, pincushions etc, which I listed in the summer.


Thursday, 28 November 2013

Linen and Lace patchwork


My linen mountain has now been laundered and pressed and inspected for any damaged areas. I love handling it and spend far too long agonising over how to do justice to the older items especially. So far, I have completed two items - a pincushion in ivory and a needle book in beiges. I have planned: pocket tissue cases, brooch pillows, trinket trays ( if I say "60's style' folded bread baskets with tied or buttoned corners you might be able to picture what I have in mind - if not, you'll have to wait and see!), possibly wedding ring cases and pillows, lavender sachets ... Perhaps you have other suggestions for me? I am particularly keen to try the trinket trays since they will post opened out flat and will, I hope, make an attractive gift item - easy to package and send onwards. Some particularly deep lace edgings have been reserved for summer bags. I also intend to search my shelves for a book, which I seem to remember, had various foldings for gift boxes and pouches. I remember the shapes being unusual and wonder if I could adapt them to interlined fabric in order to form keepsake/jewellery boxes. Notebook covers and the covers of hand bound journals would be other possibilities.

Anyway, for now, here are the pincushion and needlebook:


Tuesday, 26 November 2013

A Good Shopping Trip


A visit to a fairly local antique center, yielded quite a hoard of vintage linens, in varying stages of repair. Yet again, I chose a lovely table cloth, with a deep crocheted edging - the intention being to use the edging; only to decide that, with a few minor repairs to the drawn thread work it will still be lovely to use and shouldn't be cut up. Maybe, at some stage in the future, I'll re-purpose it. My husband was a little unsure whether to be amused or irritated. All these new textile acquisitions now have the same recycling/re-purposing/absolutely non to landfill promise as all the other items already in our possession. I must make more stitching progress. Here is the little 'lace' mountain acquired yesterday:


A set of four coasters in progress: three stitched, all four needing the ends tucking in.


Monday, 25 November 2013

Linen and Lace

These two pieces of recycling will become a needlebook and a glasses case respectively. Stitched from a patchwork of reclaimed table linen, embellished with vintage lace, some ribbons, more modern lace flowers and hand stitching in the lovely vintage flax floss which I am greatly enjoying using.


I shall probably edge the finished items in crochet as with this bookmark:


Sunday, 24 November 2013

Trying out my Peg Loom


I had this peg loom made to order a few years ago. As you can see, I have three sets of pegs -  small brass, medium (I think beech) and large (also beech). I struggled to decide how wide the loom should be. Large looms can still produce narrow work, but I wanted something quite portable - in particular, something which could be used in our campervan - although, as yet it hasn't been! I settled for this one - about 25 cm wide, thinking that, if necessary I would join strips to make a wider item.

The medium pegs produce work roughly similar in density and feel to the strips which are produced on my weaving sticks - see previous post.


This is the result of weaving on 19 medium pegs using craft cotton as the warp and strips of torn cotton fabric about 2 cm wide as the weft - the work being in the process of removal from the loom.


The finished piece. I deliberately kept the weaving quite loose - in the sense of not compacting the fabric down the warps too much. I orginally had an idea of using the weaving to make a bag. However, although it feels tactile and 'drapes' nicely, it is too thick to be practical so it will find use as a table mat - just the right size for a mug and cup cake plate - unfortunately, yesterday's daleks have now been consumed so you'll have to imagine the presence of a cake.


Since this is comparatively loose I shall probably back it with some washable fabric stitching the edges through and also following one or two of the warp threads with small 'tacking stitches' to ensure that it keeps its shape. I shall also try to find, and slip stitch in place any weft ends which I can find. This will then enable me to put this 'prototype' to good use. However, if I produce any for other people, I shall ensure a 'tighter' weave to hold the weft ends within the weaving, or deliberately leave them trailing at the row ends and stitch them securely to a backing fabric. I must try washing and drying the 'looser' version to make sure that it is a practical option.


Saturday, 23 November 2013

Stick Weaving

As promised, a quick overview of my stick weaving experiment. I bought this set of sticks and threader from a lovely stall at  the Shrewsbury Folk Festival in 2012. My 'to-do ' list continues to exceed the available hours in a week - I 'm so glad I knew where I'd put them!


Having strung the sticks with some craft cotton I wove a length using torn strips of recycled fabric about 2 cm wide. The result was quite neat and firm and pretty much what I was hoping for. Just to see what would happen, I tried two different knitting tapes. They worked well enough, but I prefer the fabric strips.


With a little more confidence, I tied off my sample, restrung the sticks, and wove another panel with strips of fabric from a shirt. The above shows the result, after tying of the ends. The unusually bright sun on my desk makes it a little difficult to see the detail. I ended up with a woven panel about 5 cm wide and about 10.5 cm long. The length is easy to extend, but the width is set by the number of sticks used. Since they must all be held comfortably in one hand whilst working, this set of five is pretty much  optimum. I wove a second panel to match. Since the craft cotton is very fine, compared to the diameter of the sticks, the fabric is, initially quite loose. However, sliding it together down the threads and tying it off firmly compacts the weaving - making it much denser, slightly less flexible, but much thicker and more durable. In order to weave a second more or less identical panel, I used the same number, width and length of fabric strips and then tied the weaving off tightly to the same dimensions as the first piece.  The ends of cotton were threaded in easily with a crochet hook. The two strips stitched together with some crochet cotton and this was the result:


Very much a prototype, I have devised a neater method of stitching for future use. The 'coaster' is dense and quite firm - really quite a practical item. I measured it carefully, then washed on a short setting and tumbled on a low heat - finishing on the radiator - and measured again. The shirting wasn't going to shrink after a life-time's use but I wasn't sure about the craft cotton. Still a little more than 10 cm, so I think that's OK.

Here it is proudly in use:


Pictured with my 'hat' about two thirds knitted. There are not enough hours in .......


Friday, 22 November 2013

Re-claiming, Re-cycling, Re-Purposing ...


.... re-using and, most importantly, re-loving. I feel compelled to use textiles to the full. Of all the materials which might be pressed into landfill, textiles perhaps do less damage than many. My sister-in-law successfully composts items which are totally beyond use! Maybe its more that I would like all the resources used in the production and transportation of the original items to benefit the world to the full. In some cases, its the beauty of the item which I want to preserve - often enhanced, or even acquired, through the aging process.

Perhaps I am also preserving memories. How many of us keep wedding dresses, Christening gowns, baby outfits? I have crazy quilt panels, pieced and awaiting embellishment, made from textiles which have been part of my life for as long as I can remember (about 50 years now!!).

A little barmy, maybe, but I have made a sort of pledge that, with a very few exceptions, all household textiles which have completed the first part of their life-cycle will be re-purposed - nothing is to be placed in the household bin. At the risk of being considered a 'little odd' this is how I have been doing so:

-  All items still fit for original purpose - send to charity shops.
-  Woolens - knitted or woven - felt (full) and use in craft projects.
-  Other Knits - weaving strips, rag rugs, stuffing, cleaning cloths.
-  Fleece - patchwork blanket, smaller items eg hats, rag rugs, 'wadding', brooch backing.
-  Shirts (and similar) - 'good' patches - used in craft projects, others in weaving (stick/peg/loom), rugs, crochet, knitting.
-  T-shirts - rag rugs (hooked, prodded, woven), pin cushion tops, knitting, crochet (storage baskets etc)
-  Table Linen - cherish and re-use all decorated bits, otherwise: patchwork, weaving.
-  Bed linen - dust sheets, rag rugs...
-  Towels - cut down and edge - cleaning cloths.
-  Denims - 'Currently stored awaiting experiment'
-  Sports socks (actually one of the most useful items - surprisingly!) - wet boot stuffers (wash/dry and re-use), polishing pads (one filled with others)
-  Jersey boxer shorts - floor/bike cleaning cloths.
-  Any other small items - rag rugs if possible or cut up for stuffing draft excluders, doorstops etc.

Naturally, all off-cuts from my craft work are carefully stored and used. Both my Meadow and Harvest designs use yarn snippets left from other projects (on a background of 'eco' felt - produced from recycled plastic bottles).


This bookmark is my first listing of an item stitched from vintage linens and lace:


I must go for now. I am part way through some stick weaving experiments - re-purposing some shirts. I'll photograph the key stages to show you.

Thursday, 12 September 2013

Crafter's Chatter


I recently read an article recounting an artist's art-free, 're-charge-the-batteries' period of a week or so of travelling, camping, photographing and generally re-stocking her 'creativity'. As she pointed out, it is not possible to partition our lives into work time/family time/leisure time as we might if we had 'regular' jobs. Certainly we try to be disciplined about setting time aside to complete items, do the necessary admin caused by on-line selling etc, but inside our heads we do not have separate departments in this way. Every aspect of our lives is intertwined with every other, 'intersections' often being the most fertile  areas - although also having the greatest potential for conflict. 

When I started this blog my children were much younger, I didn't want to include too many direct references to them in my posts and I thought observations relating to our way of life would seem tedious to any readers I may have. Having thought carefully about my reactions to a variety of other folks' posts which I have recently read, I have decided that too few 'daily references' create an impersonal, near to anonymous, feeling. Don't worry! I'm not going to start cataloguing all the minute and tedious irritations which life brings - the fact that, yet again there were three 'orphaned socks' in the washing machine and yet again they were all my daughter's etc. My intention is more to focus on celebrating the good things in our family life with brief references which explain some of the influences in my work.

My flash drive is overly full with a series of photos from earlier in the year - May half-term to be precise. Time to show you some of them and then re-claim the space (all pics are archived elsewhere!). For years, due to a limited budget, we had family tenting holidays. They could be hard work, we cooked all our own meals for reasons of economy, and coped with some dreadful weather - fortunately without much damage to equipment. The good aspects included fresh air, living with minimal 'stuff' for a while, a real sense of freedom and, usually, sociable fellow campers with whom to share an occasional drink or coffee whilst our kids enjoyed the company of their kids.

We were gradually acquiring more and more 'camping stuff'. Loading and un-loading the trailer, airing everything out, and so on, were becoming tedious. An inheritance allowed us to something wildly out of character and, instead of adding the money to our meagre savings, we bought a basic 'pre-owned' motorhome. As far as material possessions go, this has been the biggest single influence on our lives (. So many easy, affordable week ends away have been possible. All holiday planning revolves around using the van - we can't justify keeping it on the road and paying for other accommodation, but that's fine - we enjoy it so much!

In May, our son was still at University, and our daughter was spending the three-day bank holiday weekend at a scout camp. We couldn't be far away, in case of emergencies, so we booked a campsite at  Corwen. On the Saturday we walked down to the Rhug Estate farm shop. Having our kitchen on wheels with us, we like to buy and cook local produce when we can. I believe we bought pork tenderloin, lamb leg steaks -( home-produced and organic), some redcurrant preserve, and some sort of bottled gooseberry sauce comes to mind - for with the pork. After lunch we had a long local walk, set up the 'travelling bird feeder'  - the kids Christmas present to me - the pole support being 're-purposed' from a set of tent porch poles! - and pan-fried the lamb with redcurrants - yum!

Having recently joined the National Trust, my husband decided that he would like to visit Bodnant Garden. He spent quite a bit of the Sunday complaining that he was being denied access to his camera - a perfectly valid complaint - but what did he expect with all this stitching inspiration available. I have shown you one or two pics in a previous post - here are some of the others:


I am still trying to perfect a stone wall background for wisteria. I loved those old gates - so filed them away for the future. Not sure about the statue - but it sets the atmosphere. I have yet to attempt water - I think moving water will be tricky - water-lilly pools may be more easily possible.

This is just a representative selection of a productive 'day off'. The pork, cut into medallions, was pan-fried with leeks and that gooseberry sauce!


Friday, 7 June 2013

My Craft Library ..


.... the 'periodicals section'.

I have several times referred to the amount of craft-related stuff that is stored in our house. Some of it is equipment, much of it is materials but a significant amount is my 'library'.

Recent photos, some tutorials, blog references etc are now digital, but I still have a real need for physical sources of reference. I have books on needlecrafts and other craft subjects, some stored amidst my covered boxes on these shelves -


the remainder being housed on shelves in the conservatory. I have reference books on wildlife, flowers etc; and others on 'travel', mainly in the UK, and photographic collections - both featuring landscapes for reference and inspiration. Since all these are 'general references' I get away with storing them on the various family bookshelves - we have many! Recent craft magazines are kept in the conservatory and every so often I have to have a 'weeding out session'. I keep scrap books of inspirational cuttings from craft and other magazines.

There are, however, some 'magazines' which just can't be cut up/disposed of/damaged (well caused any further damage - some of them are very well read). These are kept on my 'periodicals' shelf in my craft room. Still not tidy enough to show you the entire space, but I have mentioned before that the room is really very small. When we moved into the house we had a local joiner construct fitted units to make the most use of the space. The largest dimension is a little more than the length of a standard single bed - in our case built in 'cabin style' under the bay window. The shelves pictured above are constructed above the foot of the bed. The wall opposite the bed contains the doorway. Running the length of the wall, from some cupboards above the desk, to the wall  at the foot of the bed is a shelf which sits just above the picture rail. Added support is provided by a shelf bracket and although the shelf dips very slightly it is nowhere near as bad as these photos suggest - I took them balanced on tip toe with the camera above my head and couldn't manage to hold it level!


The boxes in the first photo contain: rubber stamps, fancy papers, gift ribbon and some book end boards and 'pages' - ready cut for 'projects in waiting'. Then we have the archive boxes. Dress patterns, Burda magazines, a couple of other collections which I'll show you some other time, and these ( my oldest and most precious)


I haven't counted them, but I have two boxes probably containing more than 50 editions. The oldest in the photo is from the mid 50's. I think I may have one or two older than this. They originally belonged to a great aunt. I love the old adverts, both the fonts and the old style of type-setting, the fashions but, most of all, I love the needlecraft techniques which are demonstrated. Irreplaceable to me and worth constructing a shelf for!


Monday, 3 June 2013

Early Crafting Memories


When did you start crafting? What are your earliest memories? Please leave a comment - I'd love to hear about them.

----o0o----

A number of items have come to light whilst on my current 'tidy up the house' project. I do tend to hang on to stuff - not a hoarder in the clinical sense now featured on TV - but I do find some things hard to part with. I have recently developed a liking for disposing of excess clutter - neatly bagged for recycling - seeing the process more as one of 'gaining space' rather than of losing possessions. However, there are some things for which I must preserve a home and this is one of them - just look at the packaging!!! 


I'm not sure whether this was a Christmas or birthday gift and I don't have any photos or any other way of referencing the year in question. I do remember making a pair of shorts for my favourite teddy and would guess I was about 7 or 8 years old at the time. I'm not going to tell you exactly when that would have been but probably around the late '60s. I wish I could show you something I made on it. It chain stitches, the tension is temperamental and the stitching easily pulls un-done. It was actually quite frustrating to use and its a wonder I progressed to the adult version at all.

As an indication of scale - here it is posed next to my embellisher machine:


Although carefully wrapped in tissue paper, and in a bedroom cupboard rather than the attic, I was sad to see some rust marks on it. Both my two played with it a little - but fearing it might not be strong enough, I bought them both modern, battery-powered alternatives - neither of which proved as robust as my original!! Incidentally both of my two - my 19 year old son, and his sister, can use a sewing machine if they need to - although they have not taken to it as I did.

How were you introduced to your craft?


Friday, 31 May 2013

Knitted throw - a progress report.

I have been knitting furiously in 'spare' moments but I am still a little under half way there.

You may remember from an earlier post, that I am intending to use up supplies of blue, grey, yellow and white yarns from my stash. I am  knitting the squares in the traditional way for a throw - diagonally increasing one stitch at the beginning of each row, to a total of 50 stitches, using garter stitch. After one straight row I than decrease one stitch at the beginning of each row back to one stitch. I am using 'double knitting thickness' and this is giving me squares of just over 7 inches. I shall need a total of 100 squares and will then adjust the size by the addition of a border.

Once I had completed a dozen or so squares I tried laying them out in a random pattern to see the effect. It is actually quite hard to achieve a random placement in which squares of the same colour, or similar depths of colour do not cluster together in areas which appear to have their own unintentional pattern. After trying for a while I gave up and found some squared paper. I have sketched out a plan, by 'colour group'. I shall still have to pay attention to depth of colour when sewing the squares together. According to my plan I shall need 9 white squares (now completed), 9 yellow/cream squares (also completed), 16 striped squares (two completed) and 66 blue/grey squares (27 completed). I make this a further 53 to go - nearly half way.

The kitchen scales have taken up residence next to my knitting basket. Since many of the yarns are part balls I am checking that there is enough ( about 18 g) to finish a square before starting. A quick check showed me that I would need a further 3 100g balls ( and possibly something for the border) to finish the throw. The yarn I am using is of mixed quality - much of it acrylic. this would not normally be my choice, but many of the part balls were left over from knitting for my son when he was little and he didn't like the feel of pure wool. It has meant a very inexpensive project and, since it will cover the spare bed and will hopefully look pretty, without getting much wear, I am hoping that the yarn will not lead to too much stretching or pilling. Most of the yarn I already had - the three new balls were purchased at our market for a total of £4.47! I have plans for embellishing the final throw and I am hoping that all the materials required for this will already be in my stash.

The collection of squares so far -


Thursday, 30 May 2013

Bargain Bundles

 ......... and this one was definitely intended for me!!

---o0o---

When I was growing up, fabrics and yarns could be obtained from numerous places. There were several local, high street shops; thriving market stalls in three local towns and mail order suppliers who advertised in various magazines. 

My mother's sister was a keen knitter and bought much of her yarn from a couple of mail order companies. In those pre-internet days, the first step was to buy a shade card against which to make choices and place orders. Yarns were very keenly priced but she ordered exactly what she wanted - any element of surprise would have been most unwelcome!

My mother favoured 'bargain bundles' - a 'by-weight' package of specified quality and type - colour and other characteristics being a complete surprise. I can remember the excitement of tipping these packages out on the dining table for inspection. I still have the left-overs of some of them in my stash all these years later - some large felt pieces, a narrow lace bundle, a mixed trimmings (inlcuding broderie anglaise), and a mixed denims bundle. The latter was the only time that I remember the inspection process resulting in disappointment. Dungarees were in fashion and my mother was determined to make me some. There were some small pieces of lovely blue and white striped denim (I still have one piece!) and some solid blue, but there was only one piece which was large enough for her purpose. Unfortunately for me, lilac was neither flattering or fashionable!!

As I started to enjoy crafts I caught the bargain bug. Laura Ashley shops ( I bought from Chester, and also from Guildford - when I lived there after university) sold mixed bags of printed dress cotton off-cuts for patchwork. The bags were densely packed and, although clear cellophane, it was only possible to see the outer layer, the rest remaining a lovely surprise. I bought many of these bags, and made several items - I still have many of the fabric pieces - now considered vintage and thus more attractive than they were when new. 

---o0o---

I recently happened across Etsy shop - WorldofWoolShop. They have mixed bundles described as follows:

Basically this is top waste. It consists of dyed tops, dyed fleeces, natural tops, end of runs on the blending machines. Brilliant for felting, needle felting and spinning. This is perfect for beginners. PLEASE NOTE: This is waste, so every delivery will be different and could also contain blends and synthetic fibres.     


Wonderful! A bargain, a surprise and I love the idea of creating something from waste or left over materials. I thought I had better wait until we returned from our week end away before placing the order. It came this morning


Now this is a completely random bundle - they couldn't have known the designs which I currently produce, and yet, on sorting the bundle I found that I had:

 - meadow grass


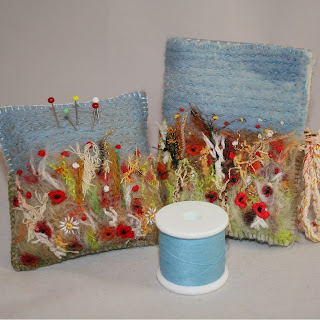
 very suitable for my meadow designs such as this pincushion


- lovely sunset colours (there was also some bright yellow for the setting sun)


suitable for use in my sunset designs such as this bookmark


- and lovely 'moorland colours'


of the variety that I use to produce my moorland design - as shown in this brooch


Our visit to Bodnant Garden at the week end, has prompted me to reconsider a design idea which first occurred to me several years ago when visiting the gardens of Haddon Hall in Derbyshire. More about this in later posts. It will be necessary to have fibers suitable for felting a 'stonewall' and I looked through my collection only yesterday and realised that I did not have very much that was suitable. Just look what came in today's bundle:


That new design is obviously meant to be!!!

In case you are wondering the fibres have been pictured on the recently-swept conservatory floor where there is good light quality (a 'spillage-free' zone - unlike the kitchen floor onto which I would not tip a fibre bundle - just in case!). As pointed out in the sales description, the bundle does contain non-wool fibres. I am sure there is a 'correct way' to identify one from the other - I find the 'sniff' test to be very effective - sheep have a way of 'naturally labeling' their fleece which persists through all the various processes - at least well enough for a discerning nose to pick up! Everything sent appears suitable for felting - particularly when blended with existing stocks and I'm anxious to get started!